Welcome to our guide on how to optimize your Wordpress website and reduce your CPU usage.
Your website might have been recently flagged for using too much CPU and most probably due to admin-ajax.php file. Worry no more! This article will save you time looking for steps to reduce your load usage and use your Wordpress website normally again. Are you ready?
Step 1: Upgrade your WordPress to the latest version
WordPress usually ships update every week. Every update contains bug fixes, performance improvements and most especially security patches that you should always get to ensure maximum protection. So it is a good habit to login to your Wordpress Dashboard every week and check for updates.
Step 2: Update all of your plug-ins and themes to a newer version
Just like Wordpress, your themes and plug-ins are all frequently updated too. Bug fixes, performace enhancements, and security patches! Make sure you get them always.
Step 3: Consider reducing plug-ins
Plug-ins are heaven-sent. We love them! But doing some review on which ones you can deactivate can greatly help reduce your load usage. Activate only the ones which you really need.
Step 4: Install WP Super Cache
When a page is served from your WordPress website, it connects to the database to see if the requested page exists. If it does exists, it looks for the data such as the content to display on your visitor's browser. Sounds so simple, right? But can you imagine the the amount of CPU resources it'll use when you own an e-commerce website, or a high traffic website? Not to mention a surge in traffic due to bots or a viral post, this can quickly cause load spikes and eventually eat up a lot of CPU resources.
One way to reduce CPU usage spikes is to install and setup a caching plugin like WP Super Cache. This plugin works as caching the first visitor’s request of a new page to a plain HTML file on the server so that if can be served to the next visitor requesting it. This way, it saves processing power and ultimately reducing CPU load.
Step 5: Install Heartbeat control
According to woorkup.com, the WordPress Heartbeat API uses /wp-admin/admin-ajax.php to run AJAX calls from the web-browser. While this is great and all it can also cause high CPU usage and crazy amounts of PHP calls. For example if you leave your dashboard open it will keep sending POST requests to this file on a regular interval.
Please follow the steps below on how to configure your Heartbeat control.
Step 1
Install Heartbeat control
Step 2
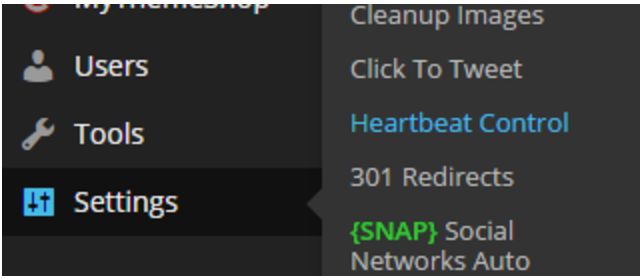
Go to Settings and click into "Heartbeat Control."
Step 3
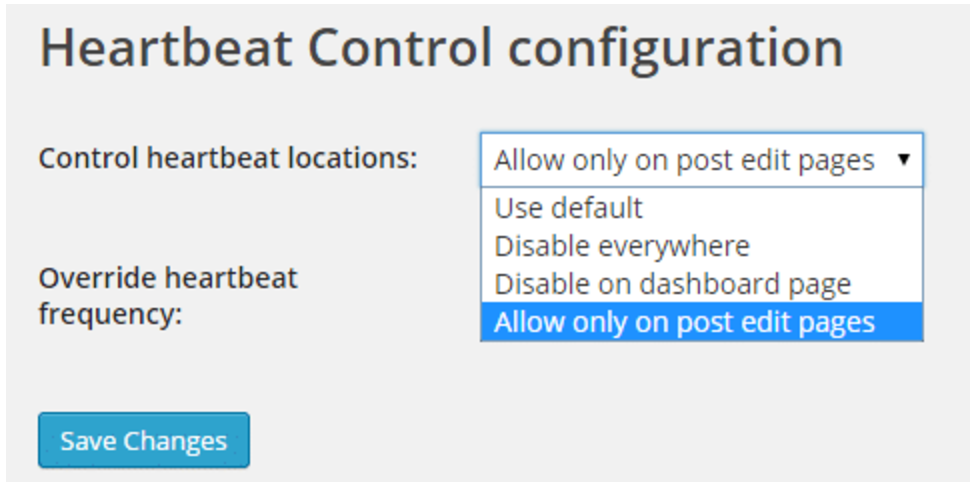
Under "Control heartbeat locations", select "(I use the "Allow only on post edit pages" myself)"
Step 6: Install P3 (Plugin Performance Profiler)
This plugin creates a profile of your WordPress site's plugins' performance by measuring their impact on your site’s load time. Often times, WordPress sites load slowly because of poorly configured plugins or because there are so many of them. By using the P3 plugin, you can narrow down anything causing slowness on your site.
Do you need further help in optimising your Wordpress? Contact Us for more details.


